In Preparation
- Only use this method if you are content to
hatch out a limited number of eggs.
I would recommend 12 or fewer. Most hens can easily cover 12 to 13 eggs, and hens of
large breeds may be able to cover even more, but we've had better
success with smaller clutches. The more eggs
under a hen, the greater the risk that some eggs will not be covered
effectively and consistantly enough for the chick embryo to develop
healthfully and successfully.
- You have to be flexible.
You will have to wait for a hen to go broody, and that won't
necessarily be when it is convenient for you. There's no proven or
widely accepted methods for encouraging hens to go broody. Heavy and
dual purpose breeds are more likely to go broody than Mediterreanian
and other breeds developed for high egg production.
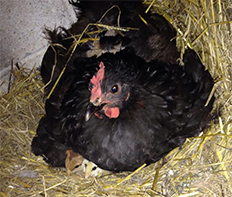
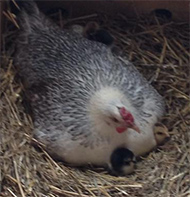
- To tell that a hen as gone broody,
look for a hen that stays flattened out in the nest box in a
trance-like state and stays there all day and night for several days
and nights. You can also look for a patch of naked skin on her
underside. If you reach under her to remove eggs, she may warn you away with a loud squawk or give you a
sharp peck, but she won't leave the nest. Although I've read that hens go broody only after they have created a clutch of
eggs often in an odd or hidden location, that has only happened a couple times for us. More typical is that our hens go
broody in a nestbox that is empty or has only a few eggs. However, while broody, they may move from one nest box to another, especially one where other hens have laid eggs.
- Once you know you have a broody hen, collect and save the eggs
you
wish to hatch. Since a hen will sit on eggs that other hens have laid,
you
aren't limited in which eggs you can collect. Select eggs from healthy,
mature hens who are popular with the roosters. If you have multiple
breeds and varieties, and want to breed pure, keep a cock and hens
alone together for at least a week before you collect eggs for
hatching.Prefer medium to large
eggs of regular shape. Don't wash the eggs, and don't use cracked,
thin-shelled, or dirty eggs. It is good to mark the eggs for
date and identification, but use a regular lead pencil, not a pen or marker.
- Don't worry about the broody hen going unbroody while you wait to collect all the eggs. Once she starts, she may remain broody for weeks and weeks.
- Until you are ready to place them under the hen, store
the eggs
at room temperature or somewhat cooler than normal room temperature. Do
not refrigerate them. Ideally the eggs should be stored where there is
some moisture in the air. Use eggs four
days old or under, if you can, but since hens don't always cooperate, this is not always possible. Eggs stored for longer than a
week will be less likely to have chicks hatch out successfully, with eggs stored for
ten days or more, the hatchability rate has dropped steeply. Store them in an egg carton or other safe
container with the pointy end pointing down. I have read advice to
slightly shift the eggs or the angle of the carton they are in each day
so that the yolks don't stick to the shells, but I no longer follow that advice myself.
- Prepare a special isolated brooding area that is separate from the flock.
This will be the home for the hen for as long as a couple of months --
from when you first have her sit on eggs until she has decided she has
finished raising the chicks. If using more than one broody hen for
natural incubation at the same
time, house those hens separately. Rival mother hens
may attack each other's eggs and chicks. There are two approaches you can take. One is to set up the brooding area outside the coop or hen house. The other is set up an isolated area inside the coop or hen house. This second option only works if it is large enough to hold the hen and nest of eggs, a food container and waterer, and enough space for the hen to get up and move around to reach the feed and water without making a mess or spilling water on the eggs. We've stretched chicken wire across part of the hen house to achieve this, but more often we've turned an unused barn stall or tack room into a brooding area. We haven't tried it, but large dog crate has been recommended to me. The advantage of keeping the broody hen where she is in visual contact with the other birds is that she will have a better chance of a smooth readjustment back into the flock when her brooding time is over. Whether a dog crate or something else, this isolated area has to have a gate or door that can be shut both so she won't abandon her new location, and the other hens can't come in to pick on her or disturb her, or lay more eggs in the nest.
- Minimally, the brooding area should be somewhere quiet,
dark, clean, draft-free,
free of lice and ticks, and safe from potential
predators (including other chickens). Don't worry about a heat source, since the hen take care of that for you. Allow ample room for the hen leave the
nest to eat, drink, and poop. We have the luxury of a
horse barn with no horses, and are able to use stalls and a tack room that is are
8'x8' and larger.
- Prepare one comfortable ground-level nest with a litter of straw, pine shavings, or some similar material. Newspaper is too slippery, unless it is finely shredded. Being
on the ground is important, because eventually
baby chicks will climb in and out and around the nest, and you don't
want them to fall or be unable to easily return to their mother. Some
hens prefer to be enclosed, but others have been happier with an open
nest. Don't create what could be a second nest or they may leave one
for the other once you want her to stick tight. The set-up we have used
most recently is to placean apple crate against one wall near a corner and line the bottom with a nest of straw. We've surrounded the rest of the floor with kiln-dried
pine shavings.
- Set up a feeder and waterer a bit of a distance from the nest. Both feed and water need to be available at all times, but a broody hen won't eat or drink while she is on the nest.
- Only after the brooding space is ready, should you move the broody hen to her new home. To match the timing, all but perhaps a day's worth of eggs should have been collected. Wait until dark
before moving the hen. That way, you won't disturb her as
much, and if she does get riled up, she should be more likely to accept
her new quarters. Once moved, some hens will go unbroody or will take a while to resettle into her broody state.
- Don't trust your hen. Before placing fertile eggs under
her, test her for at least a day
to see if she sticks tight to the nest. Before you place the eggs for
hatching in the nest, use golf balls, artificial eggs, or other regular
eggs that you weren't planning on using for hatching.
Hen and Eggs
- Once you are sure the broody hen will be a good setter, place
the fertile eggs under her all at once, so they will hatch
within 24 hours of each other. Do this at night, since you are less
likely to disturb her and cause her to reject and abandon the nest and
eggs. Don't worry how you place the eggs. The hen will shift them
numerous times over the course of the incubation.
- Maintain good records and keep track of time.
The minimal record keeping you should do is to mark your calendar for 21
days
ahead. That's when the chicks should start to hatch, although the first
chicks may start a day early. You don't want to schedule the hatch for
the same day as your Aunt Rena's 80th birthday celebration. If you keep
good records and file them where you can find them again, you can
consult them when you try natural incubation again.
- Watch for the hen's routine.
She will likely get off the nest once a day for a few minutes to eat,
drink, defecate, take a dust bath or exercise. All hens are different,
so this ritual could be in the morning or in the evening, for a very
short period or as long as half an hour. Some tenacious hens never seem
to leave and don't seem to be eating enough, but I don't know of a good
way to encourage them.
- Place a waterer far enough away from the
hen that she won't bump it or knock it over or spill it onto the nest
and eggs.
- We provide chick grower as her feed.
Chick grower has a higher protein content than regular layer feed, and
broody hens don't need the extra calcium, since they aren't laying
eggs.
- Be sure the hen returns to the right place
when she leaves the nest. Remove anything the hen might think is an
extra nest, so she won't get confused and abandon the egg clutch.
- Don't disturb either the hen or eggs any more than
you have to. The hen will do all the necessary work of turning
and adjusting the eggs, and the hen's body will provide all the warmth
and moisture the developing chicks will need.
- The less you handle the eggs, the better.
If you want to inspect and candle the eggs
to check on their progress (or lack of), resist the temptation of doing
it too often. On the other hand, you don't want to have cracked or
rotten eggs under the hen that could create health and safety problems
for the developing chicks in the other eggs. We usually do not candle
the eggs or do it only once, sometime between seventh and tenth day of
the incubation process. If you discover a rotten egg or are absolutely
sure the egg has no chick developing inside, remove it. During
the last week of incubation, expect the hen to stay on the
nest full time without turning or fussing with the eggs. That's all
natural, so leave her alone.
- Have a back up or be willing to risk
a failed hatch. Although most hens will be as faithful as Horton
in sticking tight to the nest, some may give up on the eggs altogether
or at least leave the nest for too long at the wrong time. If you have
another broody hen or an artificial incubator at hand, you can still
save the clutch. Don't worry too much, on the other hand, if the eggs
are uncovered for many hours. We have had successful hatches even after
the eggs were uncovered for eight hours at a time.
- Don't expect any warning
when the chicks are about to hatch. The sound of peeping and tapping
will give the hen a cue that the hatching is about to begin. Under the
hen, however, the sound has been too muffled for us to hear.
- The
whole hatching process will occur underneath the hen, you won't be able
to see any of it. In this regard, it is not as much fun as using an
incubator with a window. Each chick will emerge from its egg at its own
rate, and several will likely have hatched before you have any idea
that the process has even started.
- Be prepared to be awed, thrilled, and distracted.
- Once the chicks start hatching, don't peek or
remove the eggs from under the hen just to get a better look.
They are exactly where they need to be. A few, infrequent inspections
may be warranted. At first, hens are surprisingly good at multi-tasking
between incubating eggs and caring for baby chicks. The hen will
usually stay on the nest for 36 hours or longer to provide time for all
the chicks to hatch and keep the hatched chicks very close under the
wing.
- Don't handle the wet, newly hatched chicks.
Wait at least until they've had a chance to dry off and fluff out, and
most inspections can be made without touching them. Don't worry if the
chicks don't eat and drink on the first day. New-born chicks can
survive up to three days just on the yolk they absorbed before hatching.
- If the chicks have not all hatched
after a couple of days, the mother hen will start to ignore the
remaining eggs as she gets up and moves about to care for the chicks.
Although I have contemplated moving them to an incubator or placing the
eggs another broody hen, I have yet to have found a viable egg among
any a hen has abandoned. Candling will reveal whether or not a chick
has developed. Candling will not tell you whether or not the chick
inside the egg has fully developed or is alive.
- Provide an ample supply of clean water. You can use plain
water or water enhanced with an electrolite/vitamin mix. Use
waterers specially designed for chicks.
The right sized waterer should prevent chicks from drowning. We've used
plastic waterers that attach to quart sized mason jars.
- Use
chick-feeders designed to keep chicks from both pooping in them and
wasting feed by scattering feed everywhere from scratching. We have
used both long feeders and circular feeders. Feed the hen and chicks
the same feed formulated for proper chick nutrition. Make sure feed is
always available, even at night.We use unmedicated chick grower,
since it is, but you may be more comfortable with medicated chick
starter.
- Provide grit that is sized for chicks
after a few days. Curious chicks, even when tiny, will find all manner
of things to ingest, and the grit will help them digest it. Grit may be
sprinkled on at first or or provided separately. Don't use ground
oyster shell as a substitute for chick grit, as the calcium isn't good
for young, growing birds.
- Maintain dry, sanitary conditions. One
annoying, but natural thing a mother hen will do is demonstrate to her
chicks how to scratch. The most annoying and
problematic part of that is that she will kick
litter into
the waterers and feeders. This not only creates a mess, it has the
potential
of prevent ing chicks from getting clean food
and water or food and water at all. Some days we have had to clean out
and refill waterers three
of more times. Even without that activity, litter will get dirty.
Although you should remove wet litter frequently, you put off cleaning
out drier dirty litter for a while by adding clean
litter on top. Eventually you will need to remove all the dirty litter
and replace it with new, fresh litter. Your tolerance may exceed that
of the chicks and hen. When a mother hen defecates, she will produce
extra large and extrordinarily smelly poop. We remove that
immediately.
- Allow the mother hen to do much of the raising
herself. For example, since the mother hen will show them how
to drink, you shouldn't have to dip each chick's beak into the water as
you would if they were mail-order chicks. Remember that chickens are
"precocial," so the chicks will very capable of independent activity
very shortly after hatching. Although the hen may disagree, chicks
really don't learn much from their mother that motherless chicks don't
learn on their own in about the same time. On the other hand, do
provide them with a stimulating environment -- space to run around,
straw bales to climb on, perches to practice roosting on, occasional
outings outside when the chicks are at least a month old and the
weather conditions permit. I don't know for sure that it makes the
chicks any smarter, but we think it helps to unleash the instinctive
behavior of their wild bird ancestors and cuts down on bad behaviors,
such as pecking at each other, which is common with bored birds closed
in too close together. Enjoy the show, as the chicks explore their new
world and the hen calls and scolds them or especially when the chicks
poke out their heads from multiple locations about the hen's body.
Since chicks are bonding with the mother hen, however, don't expect
them to pay much attention to you.
- Keep an eye out for weak, lame, ill, and oddly
behaving chicks and take appropriate measures. You, rather
than the mother hen, may have to take care of pasty butts. Since the
chicks depend on their mother's warmth for survival, make sure all the
chicks who venture out can get back to her, and be sure they are tucked
in with their mother at night.
- Although I've read that you can do it almost immediately,
we don't introduce a mother hen and her chicks to the rest of the flock
for quite a while. We don't for two reasons. We don't trust that the
hen will always be able to defend her chicks from potential attack by
the other hens, and we haven't figured out any good way to feed the
chicks separately from the laying hens when the two groups are
integrated. Also, if for any reason you want to slip a baby chick under
a hen, do so at night if you can. Don't try to introduce a chick older
than four days.
- When the mother hen loses interest with chicks, it is time
to return her to the regular flock. She may show signs she is ready for
a change by trying to chase them away or just ignoring them. It usually
happens after about 6 weeks, but in some cases it occurs much earlier
or later. Any time after the chicks have feathered out and no longer
need a heat source, it is all right to separate them from the hen. If
the hen is lucky, she will be readily accepted back with her old gang,
and she should quickly begin laying again.
- When the chicks are about the same size as the adult birds,
they too can be introduced to the old flock. Do it slowly, and don't
expect their "mother" to recognize them or treat them special. One
reason we wait so long is that when they are that size, they will be
less picked upon and better able to defend themselves, but also that's
about that time that the chicks are ready to consume the same feed as
the adult birds. We've never lost a chicken to a hawk, and we think it
might have something to do with the fact that our chicks aren't out in
the open for too long or unsupervised until they are adult sized..
|